基于InceptionV3深度学习实现岩石图像智能识别与分类
基于InceptionV3深度学习实现岩石图像智能识别与分类
总体流程
- 整理数据集(训练集、验证集),按照目录格式分类
- 读取数据集图像,归一化处理和数据增强
- 加载预训练模型
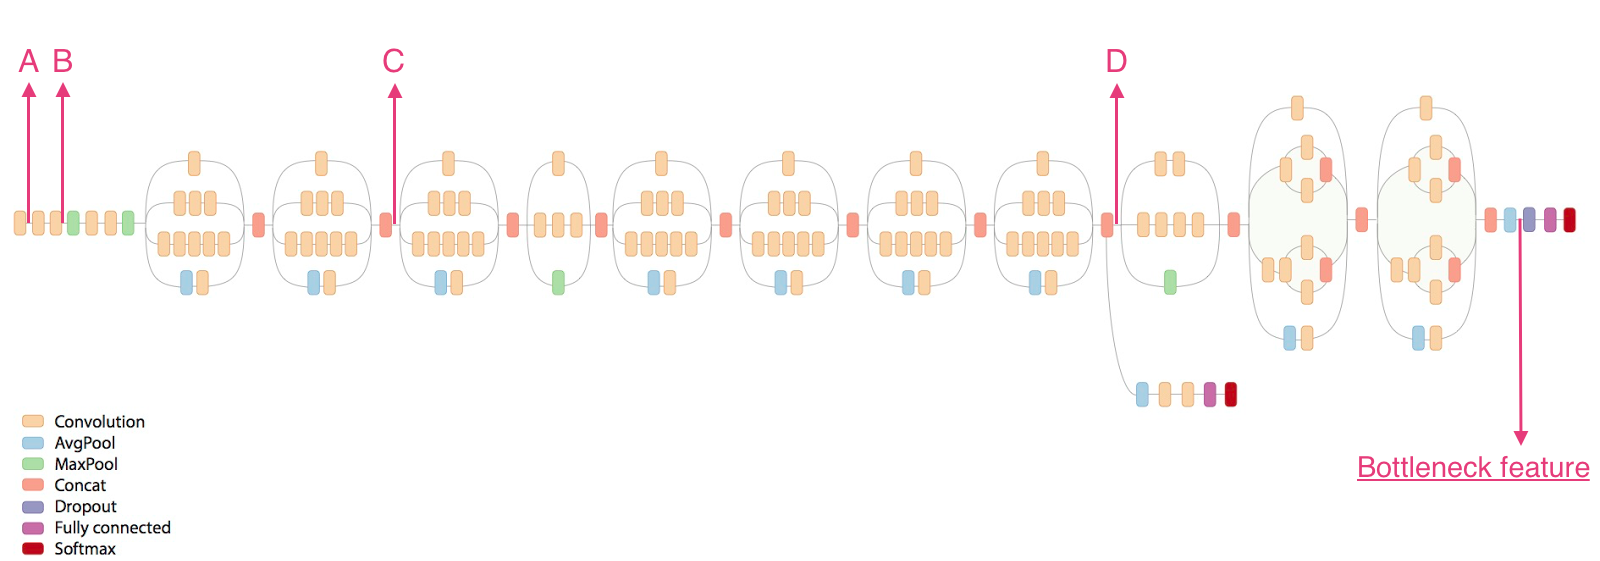
InceptionV3,作为基础模型 - 在Inception卷积神经网络的瓶颈层后设计适用于本项目的网络结构,成为my_mode
- 冻结预训练模型的所有层,变为不可训练,便于正确获得瓶颈层输出的特征,自己添加的层需要训练。相当于把InceptionV3变为一个特征提取器
- 编译、训练、保存
- 预测:读取需识别的图像,转换数据格式,预测输出
数据预处理
使用一个ImageDataGenerator图片生成器,定义图片处理以及数据增强相关
ImageDataGenerator,这个API提供数据处理相关功能,以及数据增强功能,使得数据多样化
datagen = ImageDataGenerator(rescale=1. / 255,  # 归一化
                                         zoom_range=0.2,
                                         rotation_range=40.,
                                         channel_shift_range=25.,
                                         width_shift_range=0.2,
                                         height_shift_range=0.2,
                                         horizontal_flip=True,
                                         fill_mode='nearest')
                                         # fill_mode:‘constant’,‘nearest’,‘reflect’或‘wrap’之一,
# 当进行变换时超出边界的点将根据本参数给定的方法进行处理参数(参考:http://www.51zixue.net/Keras/853.html)
- featurewise_center:布尔值,使输入数据集去中心化(均值为0), 按feature执行
- samplewise_center:布尔值,使输入数据的每个样本均值为0
- featurewise_std_normalization:布尔值,将输入除以数据集的标准差以完成标准化, 按feature执行
- samplewise_std_normalization:布尔值,将输入的每个样本除以其自身的标准差
- zca_whitening:布尔值,对输入数据施加ZCA白
- zca_epsilon: ZCA使用的eposilon,默认1e-6
- rotation_range:整数,数据提升时图片随机转动的角度
- width_shift_range:浮点数,图片宽度的某个比例,数据提升时图片水平偏移的幅度
- height_shift_range:浮点数,图片高度的某个比例,数据提升时图片竖直偏移的幅度
- shear_range:浮点数,剪切强度(逆时针方向的剪切变换角度)
- zoom_range:浮点数或形如[lower,upper]的列表,随机缩放的幅度,若为浮点数,则相当于[lower,upper] = [1 - zoom_range, 1+zoom_range]
- channel_shift_range:浮点数,随机通道偏移的幅度
- fill_mode:;‘constant’,‘nearest’,‘reflect’或‘wrap’之一,当进行变换时超出边界的点将根据本参数给定的方法进行处理
- cval:浮点数或整数,当fill_mode=constant时,指定要向超出边界的点填充的值
- horizontal_flip:布尔值,进行随机水平翻转
- vertical_flip:布尔值,进行随机竖直翻转
- rescale: 重放缩因子,默认为None. 如果为None或0则不进行放缩,否则会将该数值乘到数据上(在应用其他变换之前)
ImageDataGenerator.flow_from_directory(),实现了自动给固定格式目录下的数据集打标签,分批无序读取,返回张量类型数据集。- 这个API要求有严格的目录格式,如下:
data/
    train/
        dogs/
            dog001.jpg
            dog002.jpg
            ...
        cats/
            cat001.jpg
            cat002.jpg
            ...
    validation/
        dogs/
            dog001.jpg
            dog002.jpg
            ...
        cats/
            cat001.jpg
            cat002.jpg
            ...
generator = datagen.flow_from_directory(
dir_path, # 数据存放路径
target_size=(img_row, img_col), # 目标形状
batch_size=batch_size, # 批数量大小
class_mode='categorical', # 二分类使用binary
# "categorical" :2D one-hot encoded labels
# "binary" will be 1D binary labels
shuffle=is_train # 是否打乱
)参数:(参考:https://blog.csdn.net/mieleizhi0522/article/details/82191331)
directory: 目标文件夹路径,对于每一个类,该文件夹都要包含一个子文件夹.子文件夹中任何JPG、PNG、BNP、PPM的图片都会被生成器使用.详情请查看此脚本
target_size: 整数tuple,默认为(256, 256). 图像将被resize成该尺寸
color_mode: 颜色模式,为”grayscale”,”rgb”之一,默认为”rgb”.代表这些图片是否会被转换为单通道或三通道的图片.
classes: 可选参数,为子文件夹的列表,如[‘dogs’,’cats’]默认为None. 若未提供,则该类别列表将从directory下的子文件夹名称/结构自动推断。每一个子文件夹都会被认为是一个新的类。(类别的顺序将按照字母表顺序映射到标签值)。通过属性class_indices可获得文件夹名与类的序号的对应字典。
class_mode: “categorical”, “binary”, “sparse”或None之一. 默认为”categorical. 该参数决定了返回的标签数组的形式, “categorical”会返回2D的one-hot编码标签,”binary”返回1D的二值标签.”sparse”返回1D的整数标签,如果为None则不返回任何标签, 生成器将仅仅生成batch数据, 这种情况在使用model.predict_generator()和model.evaluate_generator()等函数时会用到.
batch_size: batch数据的大小,默认32
shuffle: 是否打乱数据,默认为True
seed: 可选参数,打乱数据和进行变换时的随机数种子
save_to_dir: None或字符串,该参数能让你将提升后的图片保存起来,用以可视化
save_prefix:字符串,保存提升后图片时使用的前缀, 仅当设置了save_to_dir时生效
save_format:”png”或”jpeg”之一,指定保存图片的数据格式,默认”jpeg”
flollow_links: 是否访问子文件夹中的软链接
构建InceptionV3模型

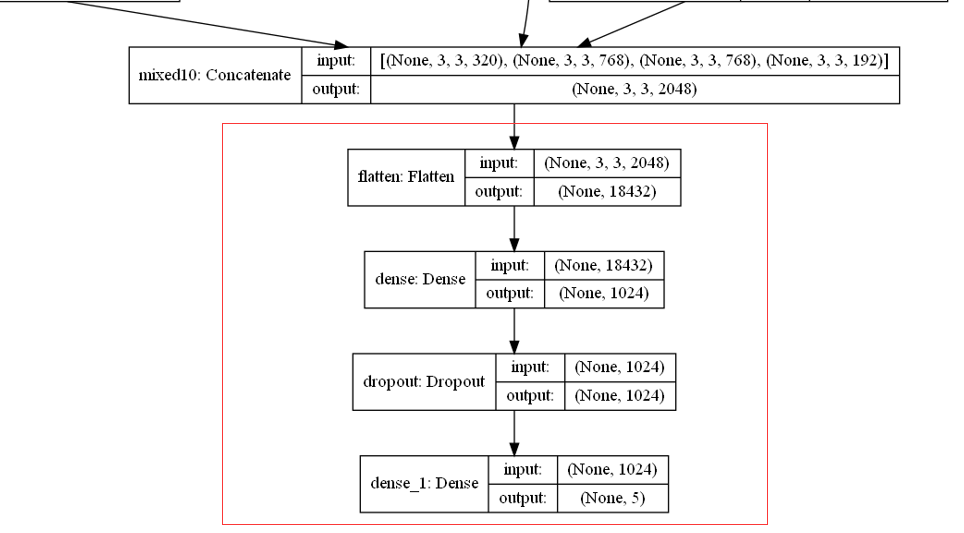
Bottleneck feature即为瓶颈层输出的特征,后面的层被丢弃。我们在瓶颈层后添加全连接层进行分类,输出变为符合概率分布的概率。添加的层结构如下。

设置整体卷积神经网络的输入为(150,150,3)矩阵。
自建层输入的是3 * 3 * 2048 的张量,因为我们是分类5类图像,所以最后一层用5个神经元,使用softmax激活函数,输出五种类别各自的概率值。
Flatten:Flatten层用来将输入“压平”,即把多维的输入一维化,常用在从卷积层到全连接层的过渡。Flatten不影响batch的大小。
Dropout:做分类的时候,Dropout 层一般加在全连接层 防止过拟合,提升模型泛化能力。而很少见到卷积层后接Dropout(原因主要是 卷积参数少,不易过拟合)
冻结源模型的所有层,针对数据集大小有三种不同方案:
- 数据集少的就冻住所有的特征提取层
- 数据集中的可以冻住开始一部分的特征提取层
- 数据集多的可以自行训练参数
可视化神经网络结构:
from tensorflow.keras.utils import plot_model
plot_model(model, to_file='inceptionV3_model.png',
show_shapes=True)def InceptionV3_model(self, lr=0.005, decay=1e-6, momentum=0.9, nb_classes=2,
img_rows=197, img_cols=197, RGB=True, is_plot_model=False):
"""InceptionV3模型,建立自己的模型
Args:
lr (float, optional): 学习率. Defaults to 0.005.
decay ([type], optional): 学习衰减率. Defaults to 1e-6.
momentum (float, optional): Defaults to 0.9.
nb_classes (int, optional): 分类数. Defaults to 2.
img_rows (int, optional): 图片行数. Defaults to 197.
img_cols (int, optional): 图片列数. Defaults to 197.
RGB (bool, optional): 是否为3通道图片. Defaults to True.
is_plot_model (bool, optional): 是否画出模型网络结构图. Defaults to False.
Returns:
[type]: 返回模型
"""
color = 3 if RGB else 1
# 假设最后一层CNN的层输出为(img_rows, img_cols, color
base_model = InceptionV3(weights='imagenet',
include_top=False,
input_shape=(img_rows, img_cols, color),
)
# 对我们的输出进行平铺操作,為全連接层做准备
x = layers.Flatten()(base_model.output)
# 增加一个全连接层,并使用relu作为激活函数,这是需要训练的
x = layers.Dense(1024, activation='relu')(x)
# 添加随机失活,抑制过拟合
x = layers.Dropout(0.2)(x)
# ,输出层,把输出设置成softmax函数
predictions = layers.Dense(nb_classes, activation='softmax')(x)
# 训练模型
model = Model(inputs=base_model.input, outputs=predictions)
# 冻结base_model所有层,这样就可以正确获得bottleneck特征
for layer in base_model.layers:
layer.trainable = False
sgd = SGD(lr=lr, decay=decay, momentum=momentum, nesterov=True)
model.compile(loss='categorical_crossentropy',
optimizer=sgd, metrics=['acc'])
model.summary()
# 可视化网络结构,生成图片
if is_plot_model:
plot_model(model, to_file='inceptionV3_model.png',
show_shapes=True)
return model
训练、保存模型
训练:用fit_generator函数,它可以避免了一次性加载大量的数据,并且生成器与模型将并行执行以提高效率。比如可以在CPU上进行实时的数据提升,同时在GPU上进行模型训练
def train_model(self, model, epochs, train_generator, steps_per_epoch,
validation_generator, validation_steps,path_save_model, is_load_model=False):
"""训练模型,载入、保存、断点续训
Args:
model ([type]): 模型
epochs ([type]): 训练次数
train_generator ([type]): 训练集
steps_per_epoch ([type]):
validation_generator ([type]): 验证集
validation_steps ([type]):
path_save_model ([type]): 保存模型路径
is_load_model (bool, optional): 是否载入模型. Defaults to False.
Returns:
[type]: 训练记录
"""
# 载入模型
if is_load_model and os.path.exists(path_save_model):
print('================载入已训练模型===============')
model = load_model(path_save_model)
# 使用tensorboard
log_dir = "logs/fit/" + datetime.datetime.now().strftime("%Y%m%d-%H%M%S")
tensorboard_callback = tf.keras.callbacks.TensorBoard(
log_dir=log_dir, histogram_freq=1)
# 断点续训
# 格式化字符,防止文件名冲突
checkpoint_path = 'ckpt/transfer_{epoch:02d}-{val_acc:.2f}.h5'
checkpoint_callback = tf.keras.callbacks.ModelCheckpoint(
checkpoint_path, # 保存路径,指定为tensorflow二进制文件ckpt
monitor='val_acc', # 监测指标,这里是测试集的acc
save_best_only=False, # 是否只保存最佳
save_weights_only=True, # 只保存权重
mode='max',
period=1 # 每period个周期保存一次
)
# 训练
print('================开始训练================')
history_ft = model.fit_generator(
train_generator,
steps_per_epoch=steps_per_epoch,
epochs=epochs,
validation_data=validation_generator,
validation_steps=validation_steps,
verbose=1, # 日志显示,0/1,1表示输出进度条日志信息
callbacks=[tensorboard_callback, checkpoint_callback])
# 模型保存
print('================保存模型================')
model.save(path_save_model, overwrite=True)
return history_ft断点续训:在模型训练时保存检查点,防止因意外情况丢失训练进度。
# 断点续训
# 格式化字符,防止文件名冲突
checkpoint_path = 'ckpt/transfer_{epoch:02d}-{val_acc:.2f}.h5'
checkpoint_callback = tf.keras.callbacks.ModelCheckpoint(
checkpoint_path, # 保存路径,指定为tensorflow二进制文件ckpt
monitor='val_acc', # 监测指标,这里是测试集的acc
save_best_only=False, # 是否只保存最佳
save_weights_only=True, # 只保存权重
mode='max',
period=1 # 每period个周期保存一次
)保存、载入模型的详细用法,请参考我的另一篇博客:https://blog.csdn.net/jun_zhong866810/article/details/119708120?spm=1001.2014.3001.5501
可视化acc/loss图
def plot_training(self, history):
"""可视化acc/loss图
Args:
history ([type]): 训练
"""
print('================绘制acc/loss图================')
acc = history.history['acc']
val_acc = history.history['val_acc']
loss = history.history['loss']
val_loss = history.history['val_loss']
epochs = range(len(acc))
plt.plot(epochs, acc, 'b-')
plt.plot(epochs, val_acc, 'r')
plt.title('Training and validation accuracy')
plt.figure()
plt.plot(epochs, loss, 'b-')
plt.plot(epochs, val_loss, 'r-')
plt.title('Training and validation loss')
plt.show()预测
- 载入我们训练好的模型(读取全部模型或者读取权重)
- 输入待识别岩石图像,图像格式标准化
- 预测并输出对于的岩石标签
# 建立标签字典,便于输出结果
label_dict = {
'0': '安山岩',
'1': '石灰岩',
'2': '石英岩',
'3': '砾岩',
'4': '花岗岩'
}
def loadModel():
"""读取全部模型数据"""
model = tf.keras.models.load_model('model/my_saved_InceptionV3_model.h5')
return model
if __name__ == '__main__':
model = loadModel()
print(model.summary())
for img_name in os.listdir(path):
img_path = path+img_name
img = image.load_img(img_path, target_size=(150, 150))
# 保持输入格式一致
x = image.img_to_array(img) / 255
# 变为四维数据
x = np.expand_dims(x, axis=0)
# 预测
result = model.predict(x)
# 返回最大概率值的索引,类型是张量
index = tf.argmax(result, axis=1)
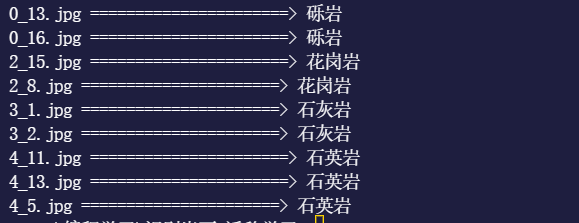
print(img_name, '======================>', label_dict[str(int(index))])

原始图像:

源代码与数据集
数据集:
链接:https://pan.baidu.com/s/15ZfB79YGxdMZwT4I3OPRiQ
提取码:zjsg
train.py
# -*- coding: utf-8 -*-
# @Time : 2021/08/15
# @Author : Z.J
# @File : train.py
# @Software: vs code
# -*- coding: utf-8 -*-
import os
import datetime
import tensorflow as tf
import matplotlib.pyplot as plt
from tensorflow.keras import layers
from tensorflow.keras.utils import plot_model
from tensorflow.keras.applications.inception_v3 import InceptionV3
from tensorflow.keras.models import Model, load_model
from tensorflow.keras.optimizers import SGD
from tensorflow.keras.preprocessing.image import ImageDataGenerator
from tensorflow.keras.regularizers import l2
class PowerTransferMode:
"""迁移学习类
"""
def DataGen(self, dir_path, img_row, img_col, batch_size, is_train):
"""读取数据集,并进行数据增强和打标签
Args:
dir_path (str)): 数据集路径
img_row (int): 行数
img_col (int): 行数
batch_size (int): 批数量
is_train (bool): 是否为训练集
Returns:
[type]: 数据集
"""
if is_train:
# ImageDataGenerator :生产图片的批次张量值并且提供数据增强功能
print('==================读取训练数据================')
datagen = ImageDataGenerator(rescale=1. / 255,
zoom_range=0.2,
rotation_range=40.,
channel_shift_range=25.,
width_shift_range=0.2,
height_shift_range=0.2,
horizontal_flip=True,
fill_mode='nearest') # fill_mode:‘constant’,‘nearest’,‘reflect’或‘wrap’之一,
# 当进行变换时超出边界的点将根据本参数给定的方法进行处理
else:
# 验证集不需要数据增强
print('==================读取验证数据================')
datagen = ImageDataGenerator(rescale=1. / 255)
generator = datagen.flow_from_directory(
                                                dir_path,  # 数据存放路径
                                                target_size=(img_row, img_col),  # 目标形状
                                                batch_size=batch_size,  # 批数量大小
                                                class_mode='categorical',  # 二分类使用binary
                                                # "categorical" :2D one-hot encoded labels
                                                # "binary" will be 1D binary labels
                                                shuffle=is_train  # 是否打乱
                                            )
return generator
# InceptionV3模型
def InceptionV3_model(self, lr=0.005, decay=1e-6, momentum=0.9, nb_classes=2,
img_rows=197, img_cols=197, RGB=True, is_plot_model=False):
"""InceptionV3模型,建立自己的模型
Args:
lr (float, optional): 学习率. Defaults to 0.005.
decay ([type], optional): 学习衰减率. Defaults to 1e-6.
momentum (float, optional): Defaults to 0.9.
nb_classes (int, optional): 分类数. Defaults to 2.
img_rows (int, optional): 图片行数. Defaults to 197.
img_cols (int, optional): 图片列数. Defaults to 197.
RGB (bool, optional): 是否为3通道图片. Defaults to True.
is_plot_model (bool, optional): 是否画出模型网络结构图. Defaults to False.
Returns:
[type]: 返回模型
"""
color = 3 if RGB else 1
# 假设最后一层CNN的层输出为(img_rows, img_cols, color)
print('=================加载预训练模型=================')
base_model = InceptionV3(weights='imagenet',
include_top=False,
input_shape=(img_rows, img_cols, color),
)
# 对我们的输出进行平铺操作,為全連接层做准备
x = layers.Flatten()(base_model.output)
# 增加一个全连接层,并使用relu作为激活函数,这是需要训练的
x = layers.Dense(1024, activation='relu')(x)
# 添加随机失活,抑制过拟合
x = layers.Dropout(0.2)(x)
# ,输出层,把输出设置成softmax函数
predictions = layers.Dense(nb_classes, activation='softmax')(x)
# 训练模型
print('================创建自己的模型==================')
model = Model(inputs=base_model.input, outputs=predictions)
# 冻结base_model所有层,这样就可以正确获得bottleneck特征
for layer in base_model.layers:
layer.trainable = False
sgd = SGD(lr=lr, decay=decay, momentum=momentum, nesterov=True)
print('================编译模型=================')
model.compile(loss='categorical_crossentropy',
optimizer=sgd, metrics=['acc'])
print('=================打印模型结构信息=================')
model.summary()
# 可视化网络结构,生成图片
if is_plot_model:
plot_model(model, to_file='inceptionV3_model.png',
show_shapes=True)
return model
def train_model(self, model, epochs, train_generator, steps_per_epoch,
                    validation_generator, validation_steps,path_save_model, is_load_model=False):
        """训练模型,载入、保存、断点续训

        Args:
            model ([type]): 模型
            epochs ([type]): 训练次数
            train_generator ([type]): 训练集
            steps_per_epoch ([type]):
            validation_generator ([type]): 验证集
            validation_steps ([type]):
            path_save_model ([type]): 保存模型路径
            is_load_model (bool, optional): 是否载入模型. Defaults to False.

        Returns:
            [type]: 训练记录
        """
        # 载入模型
        if is_load_model and os.path.exists(path_save_model):
            print('================载入已训练模型===============')
            model = load_model(path_save_model)
        # 使用tensorboard
        log_dir = "logs/fit/" + datetime.datetime.now().strftime("%Y%m%d-%H%M%S")
        tensorboard_callback = tf.keras.callbacks.TensorBoard(
            log_dir=log_dir, histogram_freq=1)
        # 断点续训
        # 格式化字符,防止文件名冲突
        checkpoint_path = 'ckpt/transfer_{epoch:02d}-{val_acc:.2f}.h5'
        checkpoint_callback = tf.keras.callbacks.ModelCheckpoint(
            checkpoint_path,  # 保存路径,指定为tensorflow二进制文件ckpt
            monitor='val_acc',  # 监测指标,这里是测试集的acc
                                save_best_only=False,  # 是否只保存最佳
            save_weights_only=True,  # 只保存权重
            mode='max',
            period=1  # 每period个周期保存一次
        )
        # 训练
        print('================开始训练================')
        history_ft = model.fit_generator(
            train_generator,
            steps_per_epoch=steps_per_epoch,
            epochs=epochs,
            validation_data=validation_generator,
            validation_steps=validation_steps,
            verbose=1,  # 日志显示,0/1,1表示输出进度条日志信息
            callbacks=[tensorboard_callback, checkpoint_callback])
        # 模型保存
        print('================保存模型================')
        model.save(path_save_model, overwrite=True)
        return history_ft
def plot_training(self, history):
        """可视化acc/loss图

        Args:
            history ([type]): 训练
        """
        print('================绘制acc/loss图================')
        acc = history.history['acc']
        val_acc = history.history['val_acc']
        loss = history.history['loss']
        val_loss = history.history['val_loss']
        epochs = range(len(acc))
        plt.plot(epochs, acc, 'b-')
        plt.plot(epochs, val_acc, 'r')
        plt.title('Training and validation accuracy')
        plt.figure()
        plt.plot(epochs, loss, 'b-')
        plt.plot(epochs, val_loss, 'r-')
        plt.title('Training and validation loss')
        plt.show()
if __name__ == '__main__':
image_size = 150
batch_size = 20
num_train = 300
num_val = 100
transfer_model = PowerTransferMode()
# 得到数据
train_generator = transfer_model.DataGen('./data/岩石数据集/train',
image_size,
image_size,
batch_size,
True)
validation_generator = transfer_model.DataGen('./data/岩石数据集/validation',
image_size,
image_size,
batch_size,
False)
# InceptionV3
model = transfer_model.InceptionV3_model(nb_classes=5,
img_rows=image_size,
img_cols=image_size,
is_plot_model=False)
# 训练模型
history_ft = transfer_model.train_model(model,
epochs=50,
train_generator=train_generator,
steps_per_epoch=num_train / batch_size,
validation_generator=validation_generator,
validation_steps=num_val / batch_size,
path_save_model='model/my_saved_InceptionV3_model.h5',
is_load_model=True)
transfer_model.plot_training(history_ft)
predict.py
# -*- coding: utf-8 -*-
# @Time    : 2021/08/15
# @Author  : Z.J
# @File    : predict.py
# @Software: vs code
from tensorflow.keras.preprocessing import image
import numpy as np
import os
import tensorflow as tf
import train
from tensorflow.python.training.checkpoint_management import latest_checkpoint

path = "./tmp/predict/"  # 预测图片的路径
path_save_model = './model/my_saved_InceptionV3_model.h5'  # 保存的模型的路径
checkpoint_path = 'ckpt/transfer_{epoch:02d}-{val_acc:.2f}.h5'  # 检查点路径
checkpoint_root = os.path.dirname(checkpoint_path)  # 检查点文件根目录
image_size = 150  # 图片格式(150,150)
# 建立标签字典,便于输出结果
label_dict = {
    '0': '安山岩',
    '1': '石灰岩',
    '2': '石英岩',
    '3': '砾岩',
    '4': '花岗岩'
}


def loadWeights():
    """
    读取保存的权重数据,需先构建网络结构一致的新模型
    """
    base_model = train.PowerTransferMode()
    model = base_model.InceptionV3_model(
        nb_classes=5,
        img_rows=image_size,
        img_cols=image_size,
        is_plot_model=False
    )
    # 从检查点恢复权重
    saved_weights = './ckpt/transfer_50-1.00.h5'
    # latest_weights = tf.train.latest_checkpoint(checkpoint_root)  只对ckpt格式文件有用!
    model.load_weights(saved_weights)
    return model


def loadModel():
    """读取全部模型数据"""
    model = tf.keras.models.load_model('model/my_saved_InceptionV3_model.h5')
    return model


if __name__ == '__main__':
    model = loadWeights()
    print(model.summary())
    for img_name in os.listdir(path):
        img_path = path+img_name
        img = image.load_img(img_path, target_size=(150, 150))
        # 保持输入格式一致
        x = image.img_to_array(img) / 255
        # 变为四维数据
        x = np.expand_dims(x, axis=0)
        # 预测
        result = model.predict(x)
        # 返回最大概率值的索引,类型是张量
        index = tf.argmax(result, axis=1)
        print(img_name, '======================>', label_dict[str(int(index))])
参考
https://blog.csdn.net/pengdali/article/details/79050662
https://blog.csdn.net/m0_46334316/article/details/117607628 感谢博主提供的岩石数据集
https://blog.csdn.net/weixin_43999137/article/details/104093095
http://www.51zixue.net/Keras/853.html
https://blog.csdn.net/mieleizhi0522/article/details/82191331


